Intermediary Guide
You’ve published a story using the Beginner’s Guide. Inky served you well, but now your project is growing. Maybe you’re juggling multiple .ink files. Maybe you want a project-wide search and replace. Maybe you want a live preview in the actual template to see how it will look once published.
This guide will set you up with Visual Studio Code—a free, modern code editor—and show you how to:
- Preview your story with the template locally without uploading to itch.io every time
- Organize larger projects across multiple files
- Use keyboard shortcuts and extensions to write and edit more efficiently
Time required: About 30-45 minutes to set up, then you’ll be faster forever.
Prerequisites: You should be comfortable with the basics from the Beginner’s Guide. You don’t need any programming experience.
Table of Contents
Why VS Code?
Inky is great for learning and small projects. But as your story grows there might be moments where you think “I just wish I could do X”. Switching to an editor like VS Code will give you:
- Project-wide search: Search (and replace!) across all your
.inkfiles at once - Customization: Themes, split screen views to have your
.inkfile on one side of the screen and your reference material on the other, etc. - Auto-build: Quickly compile your
.inkfiles into JSON with one shortcut - Synced live preview: Preview your story with the template in your browser with instant refresh on change
VS Code is what most professional developers use, but don’t let that intimidate you—at the end of the day, code is just text, so what works great for code works great for prose, too!
Step 1: Install Visual Studio Code
VS Code is free and works on Windows, Mac, and Linux.
- Go to code.visualstudio.com
- Download the installer for your operating system
- Run the installer and follow the prompts
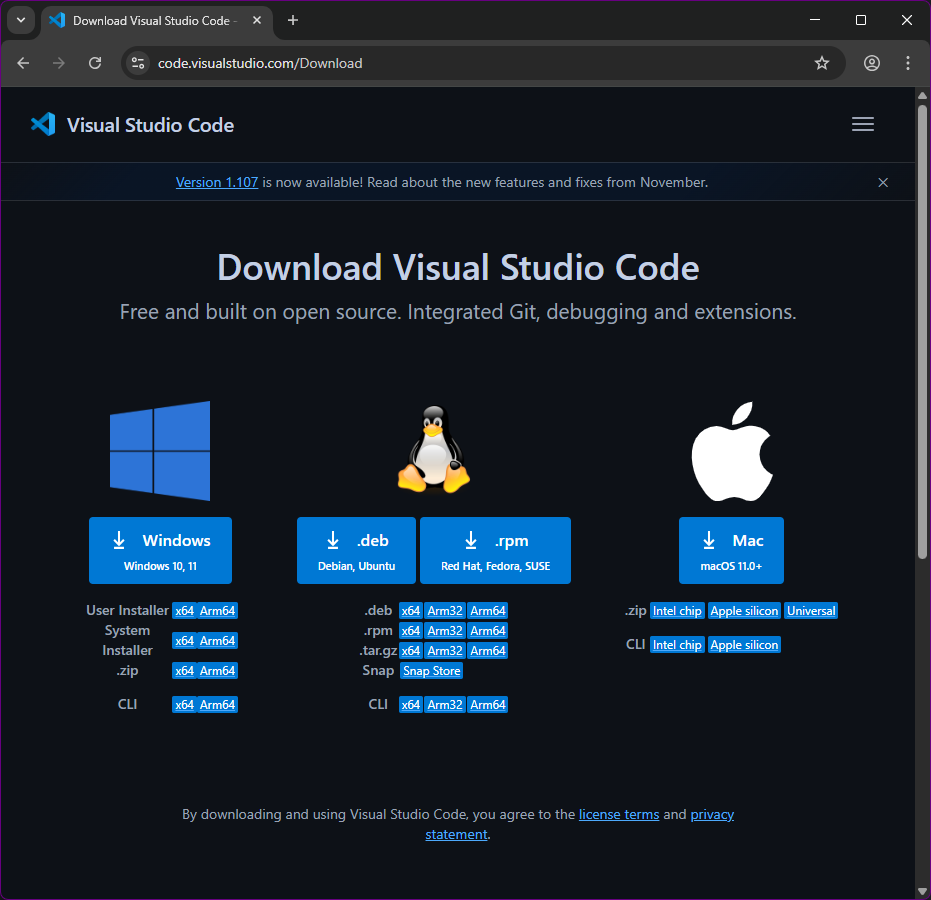
Platform-specific notes:
- Windows: Run the
.exeinstaller. Make sure to check “Add to PATH” during installation. - Mac: Drag the app to your Applications folder. You may need to authorize it in System Settings > Privacy & Security.
- Linux: Download the
.deb(Debian/Ubuntu) or.rpm(Fedora/Red Hat) package, or install via your package manager.
When you first open VS Code, it might ask about themes and settings. Pick whatever you want—and you can customize later.
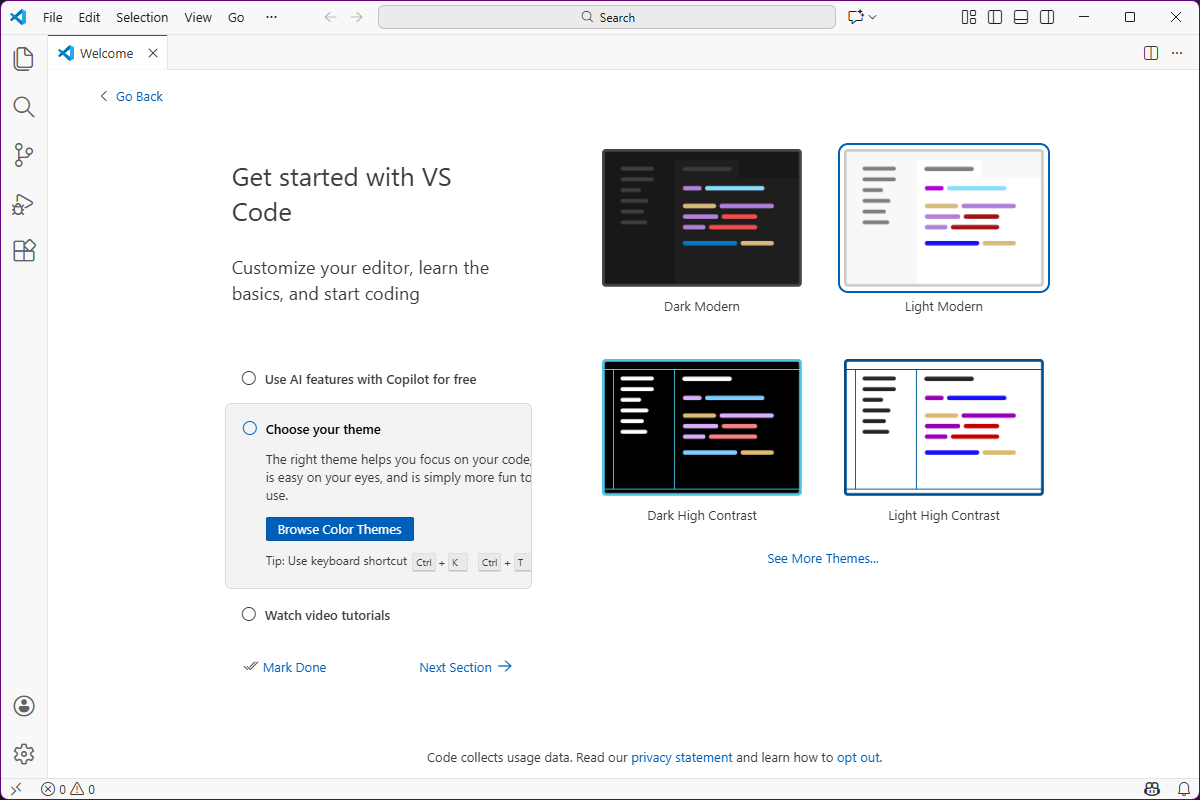
You might notice AI features advertised on the welcome screen—these are optional and won’t activate unless you explicitly set them up. VS Code is just a text editor; your files stay on your computer.
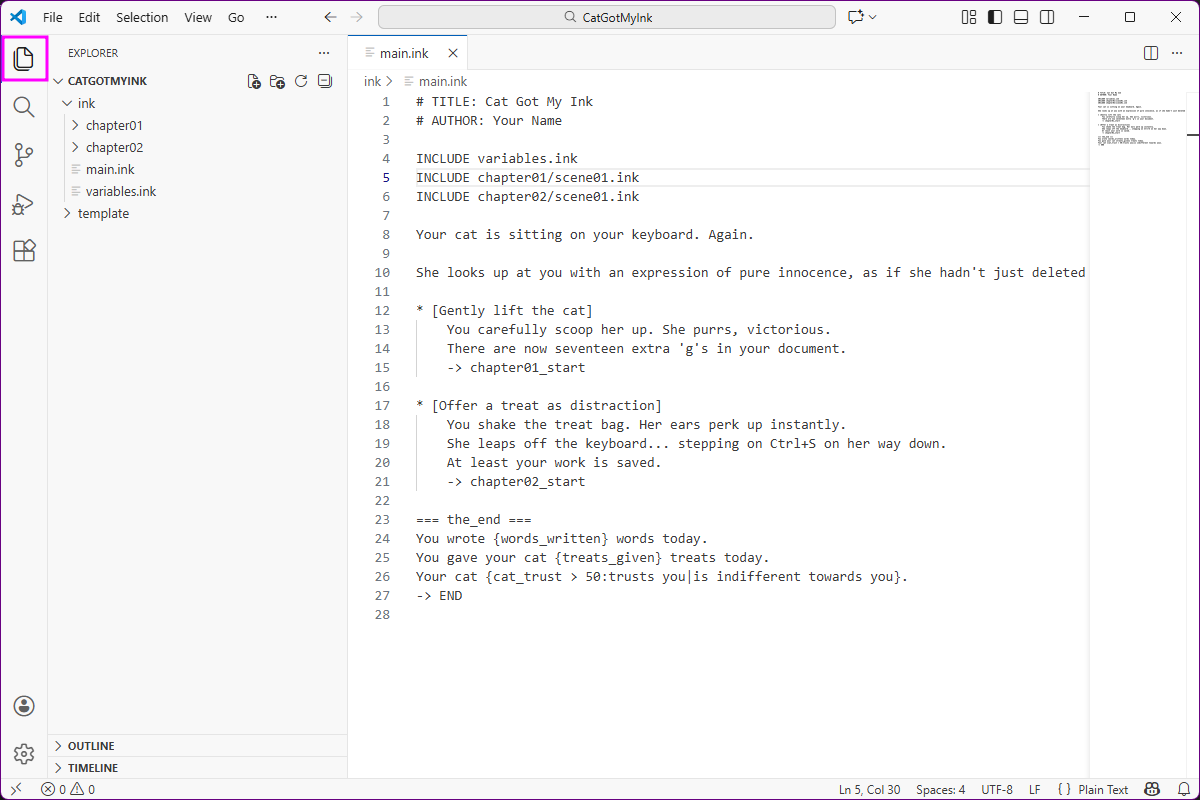
Step 2: Open your project
In VS Code, open your project.
- Go to File > Open Folder… and select your Ink project folder
- Click “Yes, I trust the authors”
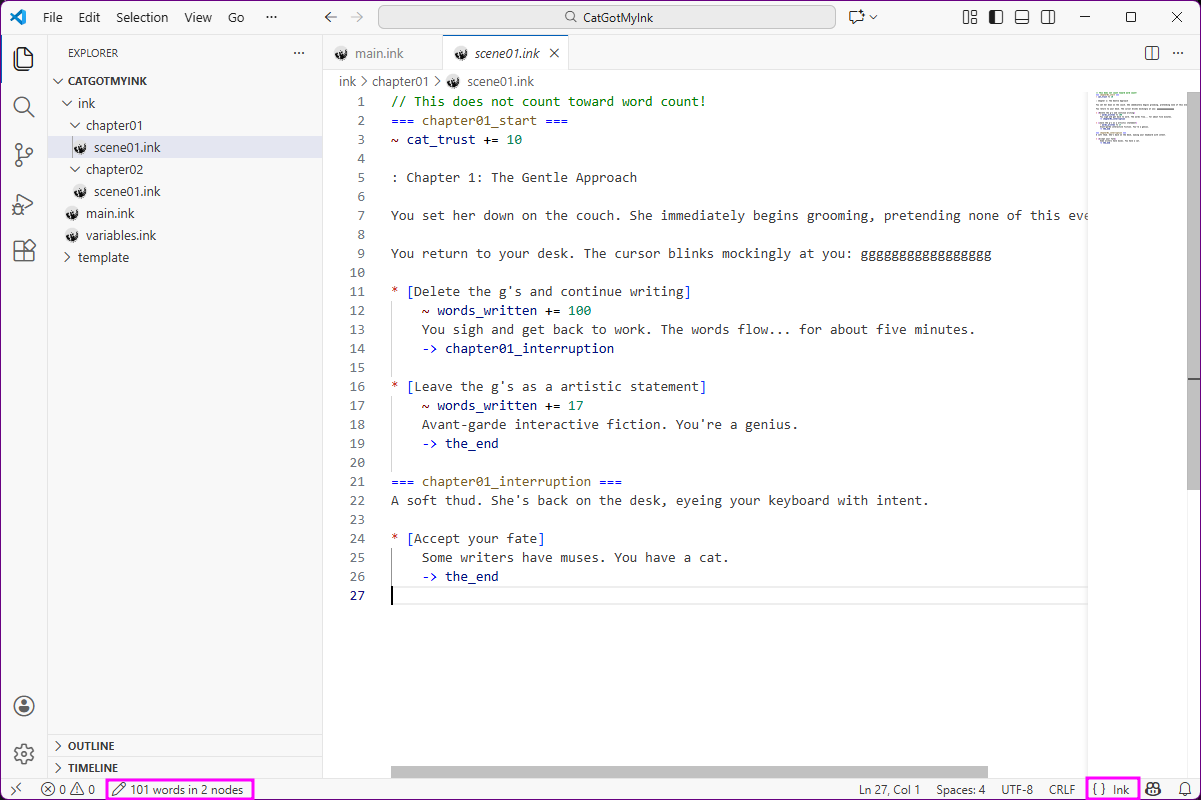
- Now you will see the explorer with all your folders and files alongside the editor panel
You can open and close the Explorer with the first tab on the side.
Tips:
- Make words wrap around so you see all full paragraphs without scrolling to the right: View > Word Wrap (
Alt+Z) - Split the view: Drag any file tab to the left or right edge of the editor until you see a highlight, then drop. Drag it back to unsplit. You can find split options in the menu View > Editor Layout.
Organize Your Project
A well-structured project makes everything easier as your story grows.
Recommended folder structure:
my-story/
├── ink/                    ← Your Ink source files
│   ├── main.ink            ← Main story file (entry point)
│   ├── chapter1.ink        ← Chapter/section files
│   ├── chapter2.ink
│   └── characters.ink      ← Character definitions, variables, etc.
├── template/               ← The web template files
│   ├── index.html
│   ├── story.json          ← Compiled story goes here
│   ├── css/
│   ├── js/
│   └── assets/
└── notes/                  ← Optional: your planning docs, outlines, etc.
If you already have a project from Inky, just move or copy your .ink file(s) into an ink/ folder. You can name this folder anything you want (src/, story/, whatever), and organize sub-folders however makes sense to you.
The important part is keeping your ink source files separate from the template. This makes it easier to update the template later without accidentally overwriting your work. It also keeps things organized when your project grows to dozens of
.inkfiles.
If you’ve been working with a one-file .ink project so far, you might be wondering how to split your ink into multiple files. Good news: Ink makes this easy! You just have to use INCLUDE in your main file ink/main.ink:
# TITLE: My Epic Story
# AUTHOR: Your Name

INCLUDE variables.ink
INCLUDE chapter1.ink
INCLUDE chapter2.ink
INCLUDE endings.ink

-> chapter1_start
The paths are relative to main.ink—so if chapter1.ink is in the same folder as main.ink, you just write INCLUDE chapter1.ink. If main.ink is in the main folder and chapter1.ink is in a sub-folder called chapters, you would INCLUDE chapters/chapter1.ink (use forward slashes).
Each included file is just a regular .ink file:
// chapter1.ink

=== chapter1_start ===
The adventure begins...

* [Enter the forest] -> forest
* [Stay home] -> stay_home

=== forest ===
// ... more content
You can also INCLUDE an .ink file in any other .ink file, but it helps to have all your INCLUDEs in one centralized place like main.ink.
Tips for multi-file projects
- One entry point: Your
main.inkshould be the only file that’s directly compiled. ItINCLUDEs everything else. - Variables at the top: Put your
VARdeclarations in a file that’s included early, before any content that uses them. - Knot naming: Consider prefixing knots with their file name (
chapter1_forestinstead of justforest) to avoid name collisions.
Step 3: Install the Ink VS Code Extension
You’ll notice when you open your .ink files in VS Code that they’re looking pretty drab right now, since there is no syntax highlighting as there is in Inky.
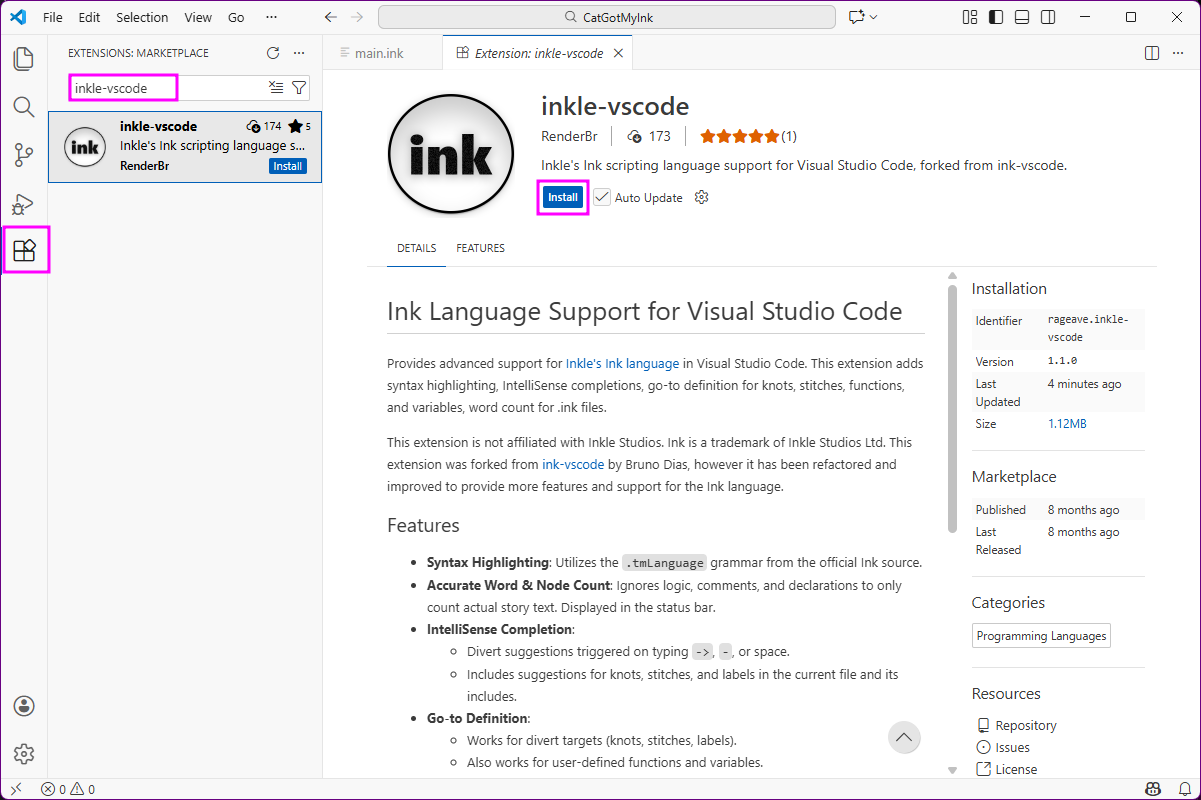
VS Code doesn’t know what Ink is out of the box. We need to install an extension that adds Ink support. In VS Code:
- Click the Extensions icon in the left sidebar (or press
Ctrl+Shift+X/Cmd+Shift+Xon Mac) - Search for “inkle-vscode”
- Find “inkle-vscode” by RenderBR (it should be the top result)
- Click “Trust Publisher & Install”
- You may have to restart VS Code to see some of the extension’s features like word count
This extension gives you:
- Syntax highlighting: Ink code is color-coded so it’s easier to see the logic at a glance
- Word count: Accurate count that ignores comments and logic blocks—just your actual story text
- Node count: See how many knots and stitches are in your file
- Autocomplete for diverts: Start typing
->and get suggestions for knot names, including fromINCLUDEd files - Go to definition:
Ctrl+Clickon a knot, stitch, variable, or function to jump to where it’s defined—works across multiple files
Tip: After installing, open a
.inkfile. If the colors look wrong, make sure VS Code detected the file type. Look at the bottom-right corner—it should say “Ink”. If it says “Plain Text”, click it and select “Ink” from the list.
You can also explore other extensions to add spell checking (search Code Spell Checker for your language) and other useful features to your editor!
Step 4: Install Inklecate (The Ink Compiler)
Inky has a built-in compiler, but since we’re not using Inky anymore, we need the standalone compiler called inklecate. This is the same compiler Inky uses under the hood.
For this part, we’re going to have to dip into the command line with a terminal since inklecate is command-line only. This means it has no graphical user interface that you can interact with, it only works in your terminal. But that’s okay, it will be quick and easy and you won’t have to open a command line ever again if you don’t want to!
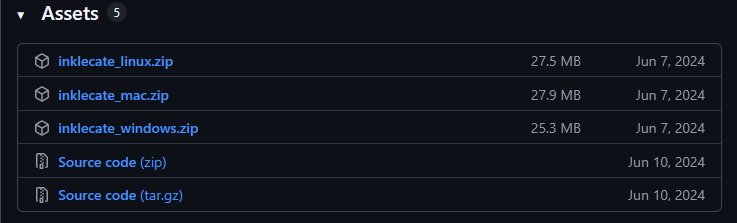
Download inklecate
- Go to the Ink releases page
- Find the latest release
- Download the appropriate file for your system:
- Windows:
inklecate_windows.zip - Mac:
inklecate_mac.zip - Linux:
inklecate_linux.zip
- Windows:
Install inklecate
Unlike most programs, inklecate doesn’t come with an installer—it’s just an executable file in a zip. That means we need to put it somewhere our computer can find it.
When you type a command like inklecate in the terminal, your computer searches a list of folders called the PATH. If inklecate isn’t in one of those folders, you’ll get “command not found.” So we need to either put inklecate in a folder that’s already in the PATH, or tell the computer where to find it.
This is a one-time setup. Once it’s done, you can run inklecate from anywhere.
Install inklecate on Windows
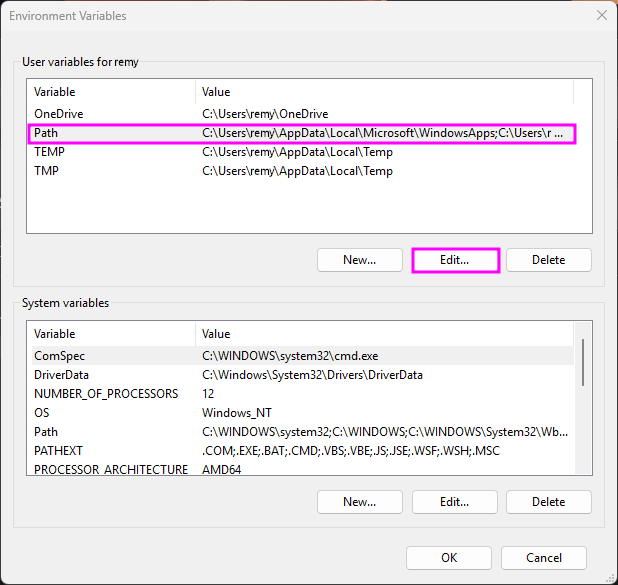
- Unzip the file somewhere permanent (e.g.,
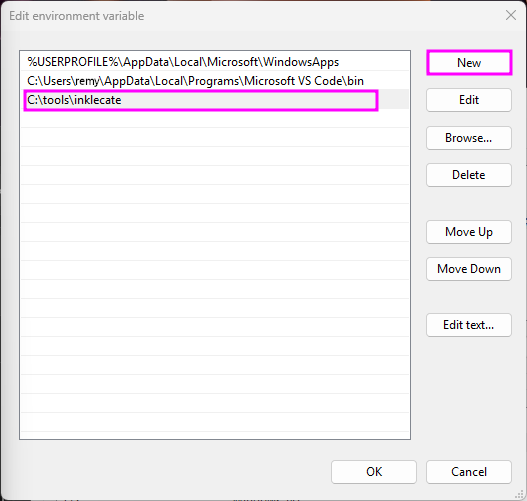
C:\tools\inklecate\) - Add that folder to your PATH:
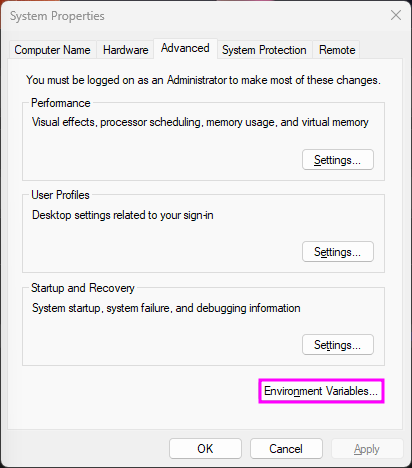
- Search for “environment variables” in the Start menu
- Click “Edit the system environment variables” and then “Environment Variables”
- Under “User variables”, find “Path” and click Edit
- Click “New” and add the folder path (e.g.,
C:\tools\inklecate) - Click OK on all dialogs
- Restart VS Code (if the next steps don’t work, you may need to restart your computer for the PATH changes to take effect)
 |
 |
 |
Install inklecate on MacOS/Linux
- Unzip the file
- Open a terminal in the folder where you unzipped the file (right-click > Open terminal)
-
Move
inklecateto/usr/local/bin/. Type this command (you will be prompted to type your password):sudo mv inklecate /usr/local/bin/ -
Make it executable:
sudo chmod +x /usr/local/bin/inklecate - On MacOS, you may need to authorize it: System Settings > Privacy & Security > “Allow anyway”
Verify that it works
In VS Code, open a terminal: Terminal > New Terminal or Ctrl+`. Then type:
inklecate
You should see the usage for the command appear. If you get “command not found”, the PATH isn’t set up correctly—try restarting VS Code or your computer.

Step 5: Compile Your Story
Now let’s compile your Ink files to JSON.
Using the terminal
In VS Code, open the terminal (Ctrl+` or Terminal > New Terminal)
On Windows, run:
inklecate -o .\template\story.json .\ink\main.ink
On MacOS/Linux, run:
inklecate -o template/story.json ink/main.ink
This tells inklecate to:
- Compile
ink/main.ink(and any files itINCLUDEs) - Output the result (
-oflag) totemplate/story.json
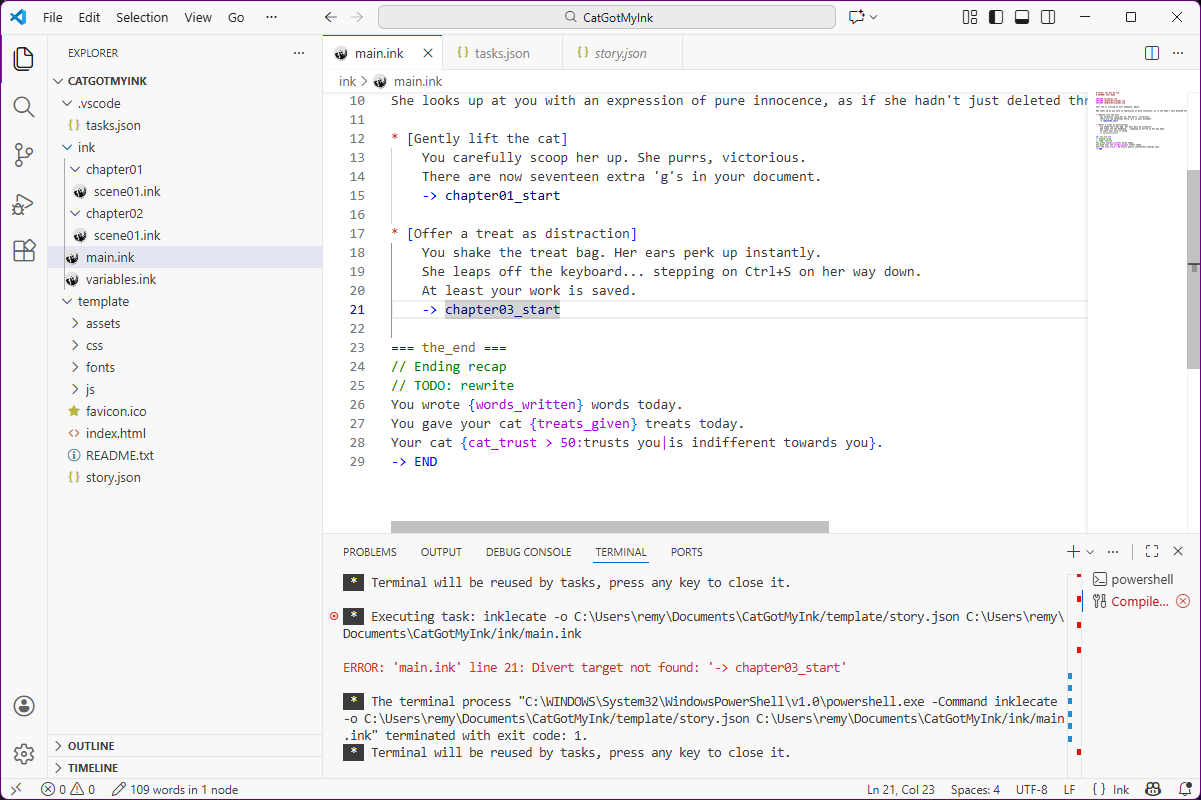
If there are errors (as in the screenshot below), inklecate will show them with line numbers. Fix them and run the command again.
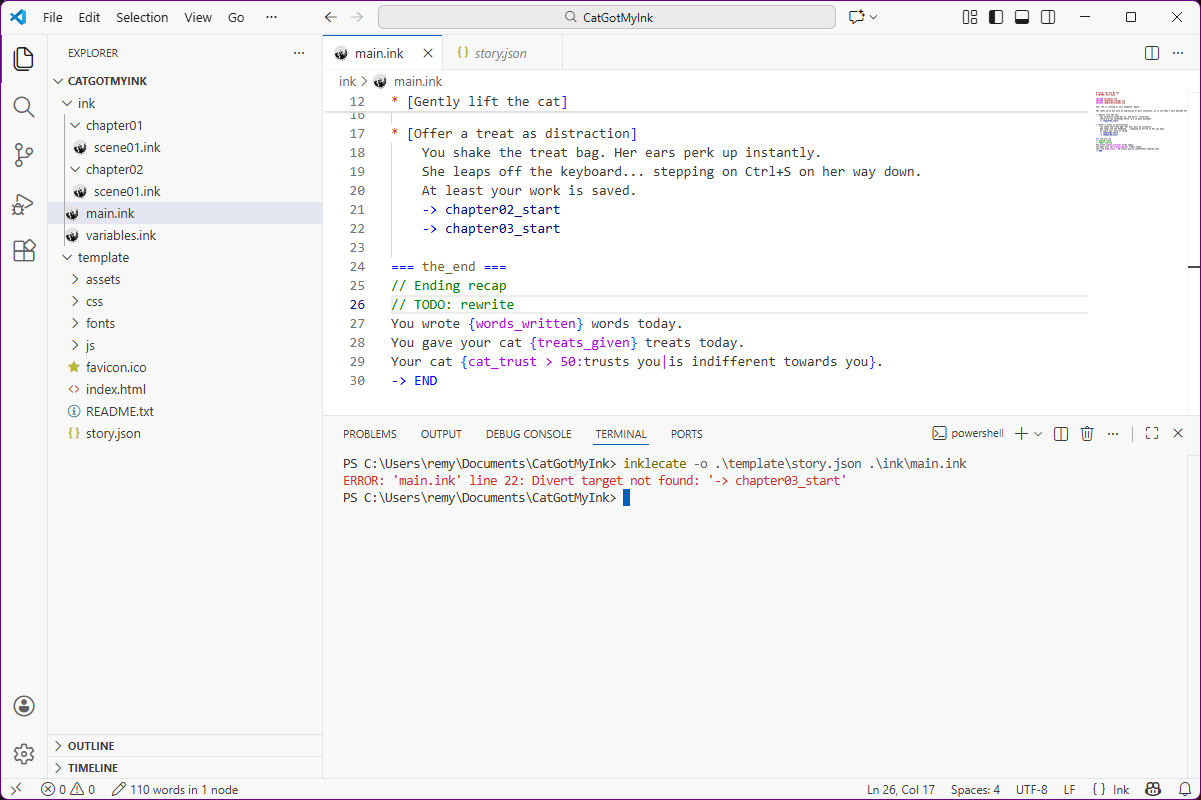
On success, inklecate prints nothing by default.
Compile with a shortcut
Typing that command every time gets old. Let’s create a VS Code task to do it with a keyboard shortcut.
- In VS Code, press
Ctrl+Shift+P(orCmd+Shift+Pon Mac) to open the Command Palette - Type “Tasks: Configure Task” and select it (use arrow keys and enter, or mouse)
- Select “Create tasks.json file from template”
- Select “Others”
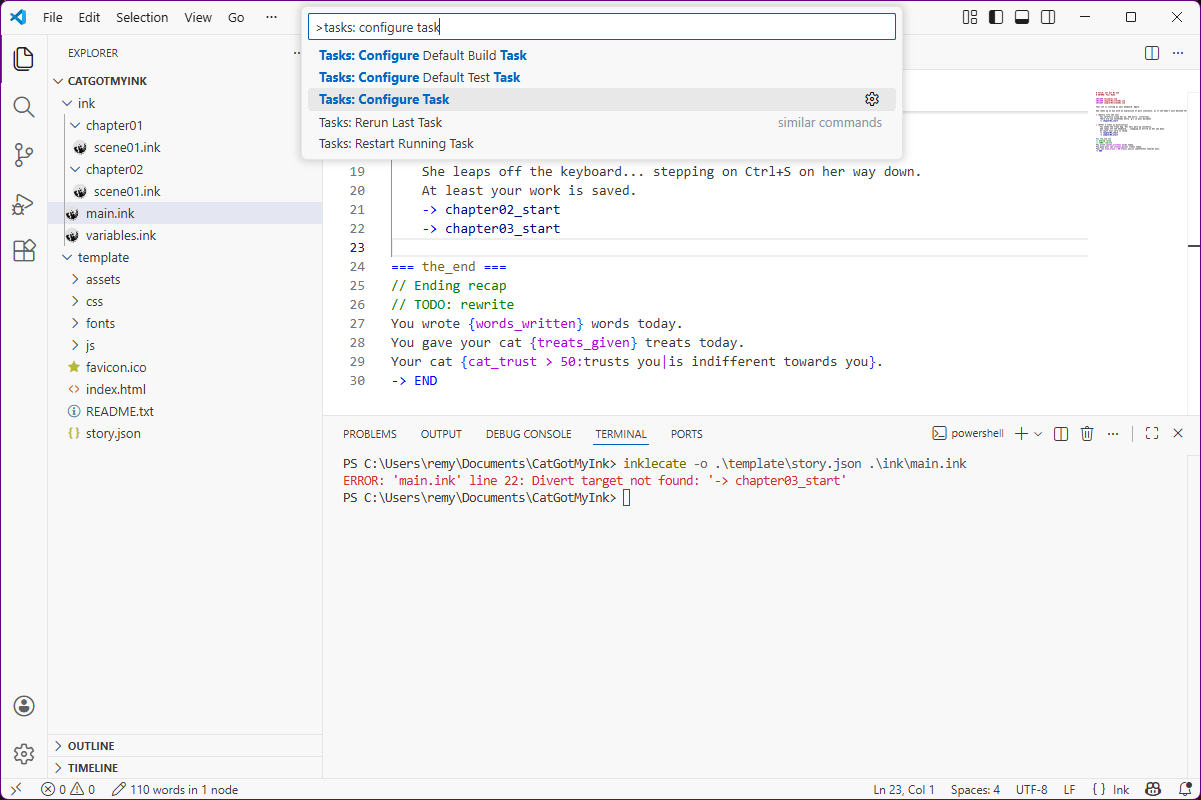
This creates a .vscode/tasks.json file. Replace its contents with:
{
  "version": "2.0.0",
  "tasks": [
    {
      "label": "Compile Ink",
      "type": "shell",
      "command": "inklecate",
      "args": [
        "-o",
        "${workspaceFolder}/template/story.json",
        "${workspaceFolder}/ink/main.ink"
      ],
      "group": {
        "kind": "build",
        "isDefault": true
      },
      "problemMatcher": [],
      "presentation": {
        "reveal": "always",
        "panel": "shared"
      }
    }
  ]
}
Now you can compile by pressing Ctrl+Shift+B (the default “Build” shortcut). The first time you do this you will be prompted to confirm the task. The terminal will open and show you if there were any errors.
Once you’re confident it works, you can change the "reveal": "always" to "reveal": "silent" to hide the output on success. If silent, an icon will briefly flash at the bottom of the screen near the word count, but the terminal will pop up to show you if it encounters an error.
Tip: You can add more tasks for other actions, like opening Live Server or cleaning up files.
Step 6: Install Live Server
Now, wouldn’t it be nice to be able to have a preview while you work, kind of like Inky but directly in the template?
Here’s the problem with testing locally on your own computer: you can’t just double-click index.html and have it work. Browsers block local files from loading other local files (like story.json) for security reasons.
Live Server solves this by running a tiny web server on your computer. It also automatically refreshes your browser when files change.
- In VS Code, go to Extensions again (
Ctrl+Shift+X) - Search for “Live Server”
- Find “Live Server” by Ritwick Dey
- Click Trust Publisher & Install
- You may have to restart VS Code

Preview with Live Server
Finally, let’s see your story in action with the template!
- In VS Code’s Explorer sidebar, navigate to your
templatefolder - Right-click on
index.html - Click “Open with Live Server” (you may have to allow it to run)
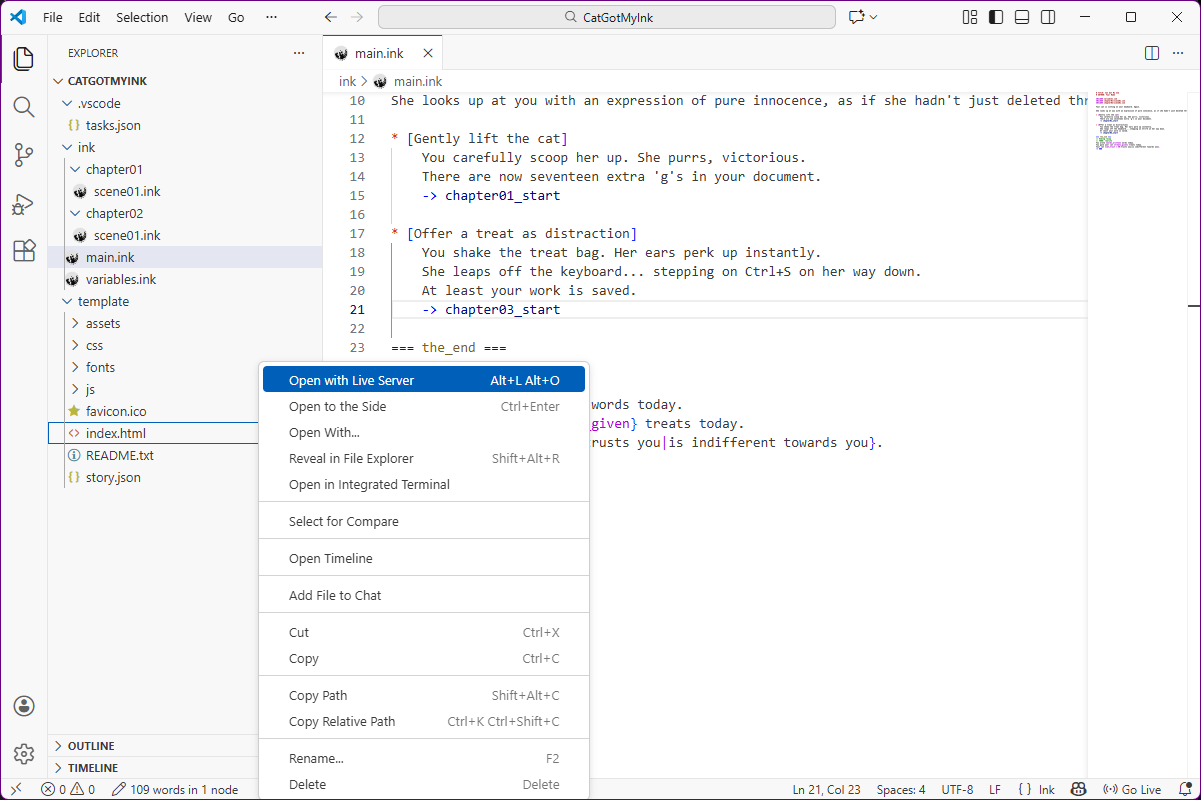
Your default browser will open to http://127.0.0.1:5500/template/index.html. Your story is now running locally!

Live Server auto-refreshes when files change. Since compilation overwrites story.json, the browser usually refreshes automatically—but if it doesn’t, try Ctrl+Shift+R.
Want other options? See Local Testing for alternative ways to preview locally.
The workflow
From now on, your workflow is:
- Edit your
.inkfiles in VS Code - Compile with
Ctrl+Shift+B - Check your browser (it should auto-refresh)
That’s it!
Useful VS Code Features
Now that you’re in VS Code, here are some features that’ll make your life easier:
-
Search across files: Press
Ctrl+Shift+Fto search all files in your project. Great for finding where you defined a variable or used a knot name. -
Go to definition:
Ctrl+Clickon a knot or stitch name to jump to where it’s defined. Works across files. -
Multiple cursors: Hold
Altand click to place multiple cursors. Useful for editing several similar lines all at once. -
Outline view: The Outline panel (in the left sidebar, or View > Outline) shows all knots and stitches in the current file. Click to jump to any section.
-
Split editor: Drag a file tab to the side of the editor to view two files side-by-side. Useful for referencing one file while editing another.
-
Auto save as you write: Enable File > Auto Save to save your work automatically as you type.
-
Quick comments: Comment a whole line or paragraph with
Ctrl+/
Keyboard shortcuts cheat sheet
Press Ctrl+K Ctrl+S to see all keyboard shortcuts. You can search and customize them.
Common ones are:
| Action | Shortcut |
|---|---|
| Open Extensions | Ctrl+Shift+X |
| Open Terminal | Ctrl+` |
| Build (compile Ink) | Ctrl+Shift+B |
| Search all files | Ctrl+Shift+F |
| Go to definition | Ctrl+Click |
| Command Palette | Ctrl+Shift+P |
On Mac, replace Ctrl with Cmd.
Troubleshooting
“inklecate: command not found”
- Make sure you added inklecate to your PATH
- Try restarting VS Code or your terminal
- On Windows, restart your computer if restarting VS Code wasn’t enough
“The term ‘inklecate’ is not recognized” (Windows PowerShell)
- Try using Command Prompt instead of PowerShell
- Or use the full path:
C:\tools\inklecate\inklecate.exe
Live Server doesn’t start
- Make sure the Live Server extension is installed and enabled
- Make sure you right-clicked on
template/index.htmlspecifically - Check if another application is using port 5500
- Try stopping Live Server (click “Port: 5500” in the status bar) and starting again
Story doesn’t update after compiling
- Make sure you’re compiling to the right location (
template/story.json) - Try a hard refresh in your browser (
Ctrl+Shift+R) - Check the terminal for compilation errors
Ink extension doesn’t highlight syntax
- Make sure the Ink extension is installed and enabled
- Make sure the file has a
.inkextension - Click the language indicator in the bottom-right corner and select “Ink”
- Restart VS Code (this forces extensions to reload)
Next Steps
You’re now set up for a professional Ink development workflow. Here’s where to go from here:
Keep improving
- Advanced Guide — Version control with Git, automated deployment, collaboration
- Developer’s Guide — Modify the template itself, contribute to the project
Explore the template
- Quick Reference — All template features at a glance
- Functions — String manipulation, math, and time functions
Learn more Ink
- Writing with Ink — The official Ink documentation
- Ink Patreon — Advanced tutorials from the creators
Questions? Open an issue on GitHub.